Bene Studio Serverless Workshop - Calorie Counter App

Serverless architectures are application designs that incorporate third-party “Backend as a Service” (BaaS) services, and/or that include custom code run in managed, ephemeral containers on a “Functions as a Service” (FaaS) platform. [1]
Based on our experience when building MVPs or realtime apps, Firebase is a really good choice both for database and backend. With Firebase Functions there is no need to configure any servers and Cloud Firestore can be a good candidate for realtime apps.
Pardon the interruption, we have an important message!
We are looking to expand our team with talented developers. Check out our open positions and apply.
SIMPLE CALORIE COUNTER BACKEND
This post gives an insight into Firebase Functions and Firebase Cloud Firestore using JavaScript. You can use other languages with Firebase Functions as well. Completing this tutorial you will have a calorie counter backend app without provisioning or managing any servers and a React frontend.
Prerequisites
You should have Node.js installed and have some JavaScript knowledge.
Create a Firebase Functions Project
If you get stuck, check https://firebase.google.com/docs/functions/get-started
First, you should install Firebase CLI tools:
npm install -g firebase-tools
Next step is to log in to your Firebase account:
firebase login
Now you can generate the boilerplate for your project. This post uses JavaScript with ESLint. Follow these steps:
firebase init functions
Select a default Firebase project for this directory: [create a new project]
What language would you like to use to write Cloud Functions? JavaScript
Do you want to use ESLint to catch probable bugs and enforce style? Yes
Do you want to install dependencies with npm now? Yes
✔ Firebase initialization complete!
You may have noticed that you have to create the project manually at Firebase’s web console.
Project creation is only available from the Firebase Console
Please visit https://console.firebase.google.com to create a new project, then
run firebase use –add
Don’t forget to add your newly created project:
run firebase use –add
Which project do you want to add? calory counter-1a1a1a
What alias do you want to use for this project? (e.g. staging) staging
WRITE SOME CODE
Repo of the code: https://github.com/benestudio/serverless-firebase-tutorial
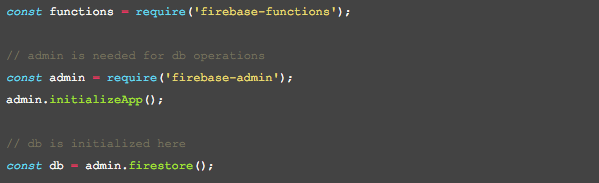
Require modules, initialize app and db.
Now you can define backend endpoints, insert data to the DB and query data from it.
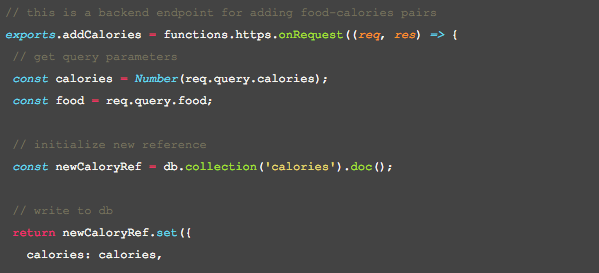
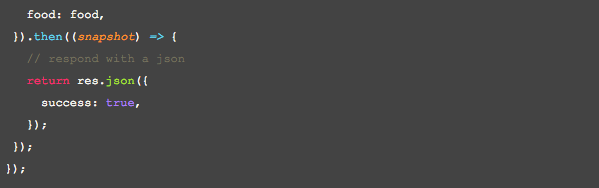
Let’s create an endpoint that inserts new calories-food pairs. Check the comments.
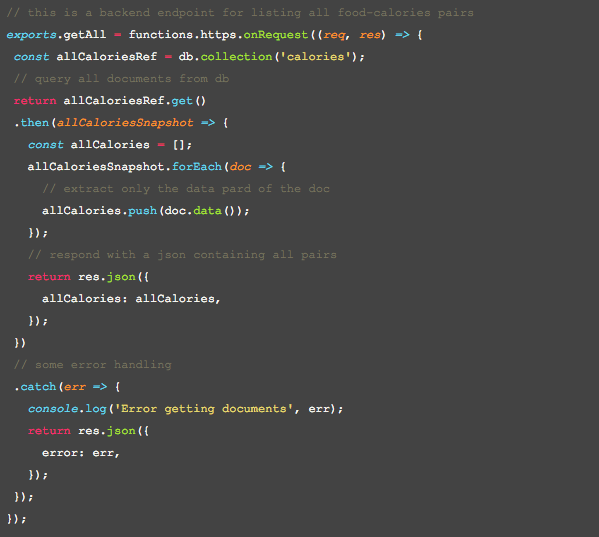
Now let’s create an endpoint that lists all calories-food pairs. See comments.
Deploy
Finally, you can deploy your newly created functions to Firebase Functions in a few seconds.
npm install –save redux-saga
Or optionally:
firebase deploy –only functions:addMessage
TRY IT OUT
Go to Firebase Web Console https://console.firebase.google.com/
Select your project.
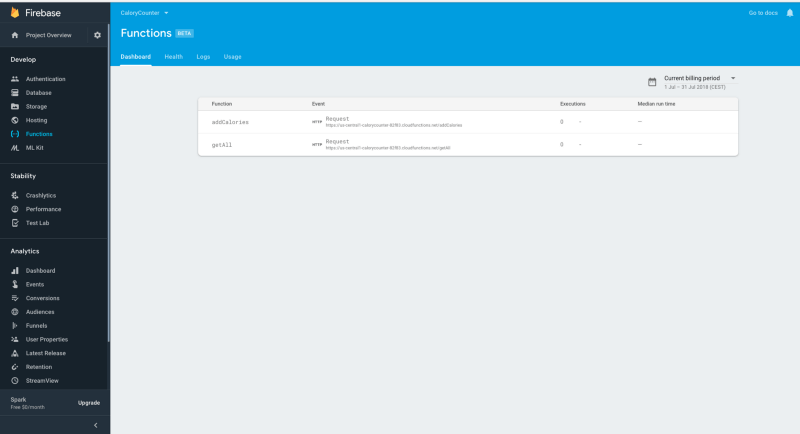
Select Functions from the left-hand side menu.
Now you should see URLs to your functions on the Functions dashboard.
Create a new food-calories pair simply calling your function with the given URL even from the browser:
You should see a response like this:
{“success”: true}
Now list all items like this:
https://YOUR-URL.cloudfunctions.net/getAll
Now you should see all the items present in the calories collection in the DB.
Check the DB as well:
Go to https://console.firebase.google.com/
Select your project.
Select Database from the left-hand side menu.
Select Cloud Firestore from the drop-down in the title.
Now you can query and manage your data.
WHY IS SERVERLESS GOOD?
Serverless architectures may benefit from significantly reduced operational cost, complexity, and engineering lead time, at a cost of increased reliance on vendor dependencies and comparatively immature supporting services. [1]
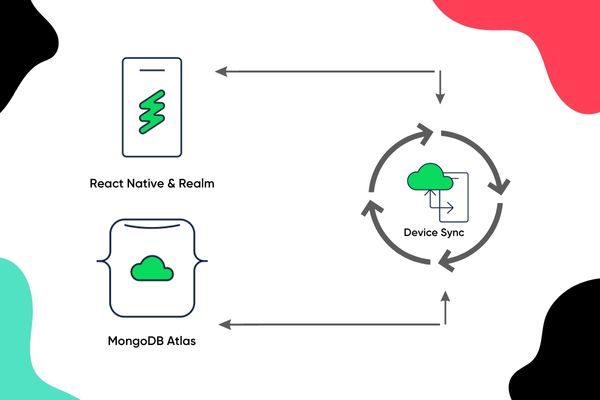
FRONTEND FOR A FIREBASE APPLICATION
With firebase on backend and with cool cloud functions, you may want to create a frontend also for your awesome application. We decided to create a simple react frontend for Calorie Counter application. If you like to see how can you create your own here is a little tutorial for you.
INITIAL STEPS
For an easy start, firstly you may clone our repository at here: https://github.com/benestudio/serverless-firebase-fe-tutorial
After you cloned it, you can install the dependencies with npm or yarn. We assume you have already a working firebase account with prepared firestore and cloud functions.
I think the main question here, how can you communicate with cloud functions and the firestore?
INITIALIZE FIREBASE CLIENT
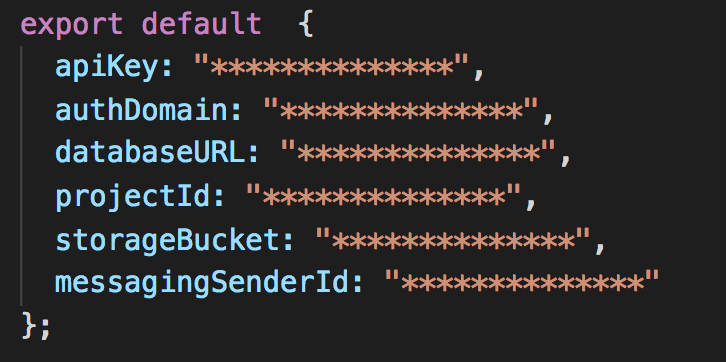
At firebase developer console, you can find in the project overview page, a webapp button. After you click on it, the firebase will show you the configuration for connect from browser to the backend.
For better security, you may want to hide these configurations before you upload to a public repository. For this, we create a firebase.config.js file.
1. Create a new file in <project-root>/src, named firebase.config.js
2. Put the config object value to it from firebase developer console:
CALLING CLOUD FUNCTIONS
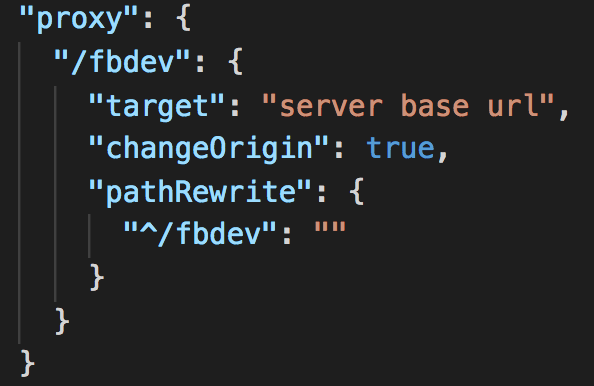
In code level, we will use axios to call the endpoints. But, for local environment, we will need a proxy for ajax calls. I think this is a most secure way to work with your backend without you have to configure allow-access-control-origin headers and so.
We have to deal with two different env development and production. In production, we will use the right firebase configurations to rewrite the api calls. But for development, we will use webpack-dev-server proxy capabilities. Fortunately, in create-react-app skeleton, the whole configuration is already set for you, you have only deal with the package.json
The target property is your cloud functions base URL, like https://YOUR-URL.cloudfunctions.net/, so basically is the same base URL that you already familiar with from calories firebase lecture. The other part of the configuration is basically part of the webpack dev server proxy configuration. For more details, you can find a link below.
CODE LEVEL API CALLS
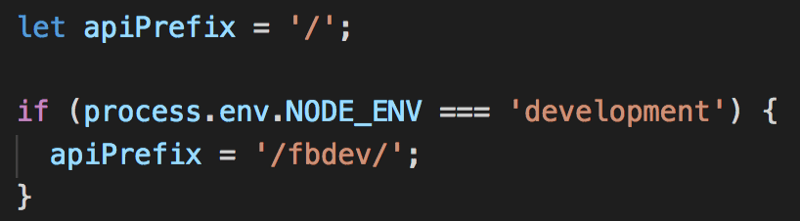
For calling the cloud functions with javascript I used axios, because it’s clear and simple. But here we have to handle the production and the development differences. In the src/api.js you can find one way (there is a lot of different ways to do this) to set a base URL for our API calls:
HOSTING AND DEPLOYMENT
We assume you already installed the firebase cli tools globally. After you login with cli (firebase login), you have to initialize the project hosting (firebase init). At the firebase terminal menu, you have to select the hosting, only the hosting. It will ask you some questions:
1. The public folder in our case is the build folder
2. You have to deny the overwrite of index.html
3. And yes you want to rewrites
After you initialized the hosting, you will have two files in the root, a .firebaserc file and a firebase.json. You have to modify the firebase.json.
As I mentioned before, you have to deal with production api calling. But the hardest part is to rely on firebase architecture. You have to just config the right rewrites:
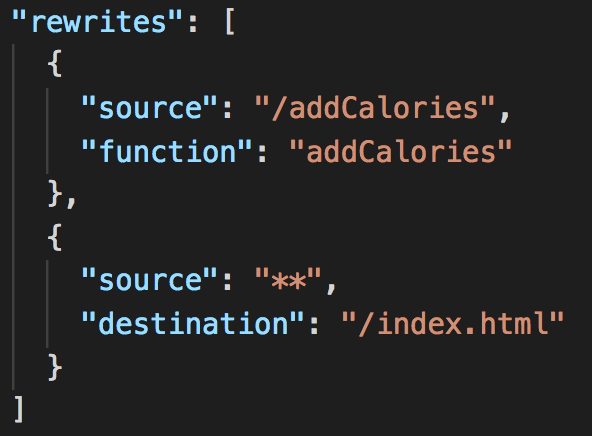
Under the hosting section, you have to add these configurations. The ** is for our single page app, and the first is our api call.
RUN IN DEV MODE
After you configured everything as well, you can start the application in the terminal, just simply call the yarn start or npm start command. The application will start for you under 3000 port by default.
BUILD AND DEPLOY
When everything is ready, you can give the yarn build or npm run build commands. After, you can call firebase deploy – only hosting command, and just a few moments later, your web application is running in the cloud.
OTHER RESOURCES:
REFERENCES
[1] https://www.martinfowler.com/articles/serverless.html