Using Schedulers and Cron in Node.JS

At bene : studio we love knowledge sharing to help the community of professionals. With 10+ years and over 100 projects behind us, we have a vast amount of experience. This is why we have launched a knowledge base on our blog with regular updates of tutorials, best practices, and open source solutions.
These materials come from our internal workshops with our team of developers and engineers.
Pardon the interruption, we have an important message!
We are looking to expand our team with talented developers. Check out our open positions and apply.
Introduction
Scheduling is simply the process of planning the times at which specific tasks are carried out. In programming, scheduling refers to the planned/timed execution of background programs. The programs that carry out schedules are referred to as Schedulers. In common computer science parlance, scheduling is usually closely knitted to Operating Systems; however, for this article, we will be treating scheduling and schedulers from a general perspective.
Schedulers are applications written to control the background execution of jobs. They run these jobs at the specified time, intervals, or dates. Jobs are blocks of codes that carry out a specific function. The execution of these jobs can be a one-off event or, in most cases, periodic. Schedulers are usually written to run independent of external interference and not interfere with the execution of foreground programs.
Application of Schedulers
The common application of schedulers includes but is not limited to Operating Systems queue processing, periodic notification services, handling asynchronous/semi-asynchronous processes, etc.
Cron and Cron-job
Cron is a standard Unix utility scheduler that is used to schedule commands, tasks and/or programs for automatic execution at specific intervals, times or dates. Cron-jobs are ideal for handling repetitive tasks. A cron/job can be divided into three major parts.
- The script that is to be called or executed.
- The command that executes the script regularly
- The action or output of the script (which depends on what the script does).
Cron Expression
Cron expression is a string that consists of 5 or 6 characters each separated by a space, it describes details of the schedule.
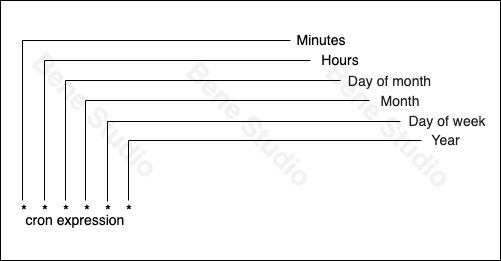
Diagram showing the sections of a cron expression and what they each represent.
| Column | Values | Allowed Characters |
| Minutes | 0-59 | *, – |
| Hours | 0-23 | *, – |
| Day of month | 1-31 | * , – ? L W |
| Month | 1-12 or JAN-DEC | *, – |
| Day of week | 0-6 or SUN-SAT | * , – ? L # |
| Year | 1970-2099 | *, – |
Table showing possible values and characters in a cron expression
Allowed Characters
- Commas (,): a comma is used to separate items. For example, * * 1,2,3 * * * means every 1st, 2nd and 3rd day of the month, * * 1,2,3 JAN, MAR * * means every 1st, 2nd and 3rd day of January and March.
- Dash (-): a dash indicates range. For example, * * * * 0-4 * means every 1st to 5th day of the week. Note that the Day of the week starts from 0 being the first day of the week (Sunday) to 6 being the last day of the week (Saturday).
- Asterisks (*): when used in all fields (* * * * * *) means that event should happen for every time unit. When used in any field it means every time unit of the field. for example, “ 20 * * * 2 * “ means the event will occur 20 minutes past every hour on every Tuesday of every week and every year.
- Slash (/) : slash acts as a step i.e incremental value. It is used in combination with allowed values. For example, a “0/15” in the <minute> field means at “0, 15, 30 and 45 minutes of an hour” i.e, every 15 minutes interval starting from 0.
Visit here to read up more on standard and non-standard cron characters
Scheduling in Node.JS
Most times, when building applications in Node, our application might be expected to carry out repeated tasks. For example:
- Clearing logs from the database
- Crawling the web periodically
- Sending periodic notifications
These processes can be handled using cron jobs that run periodically in the background. However, we can also use schedulers to handle asynchronous tasks and this will be our focus in this section of the article.
What we will be building
We will build a simple microservice consisting of two services- a test server and a notification server. Notifications within our application will be handled asynchronously. We will be using the database as a queue to save our notifications and schedulers to handle sending of notifications in the queue.
Prerequisites
To effectively follow through with this tutorial, you will need the following:
- A good understanding of Node Js and Typescript
- Have Node installed on your machine
- Have a node package manager like npm or yarn installed on your machine. For this project, we will be using yarn
- A basic understanding of Koa framework
- A basic understanding of MongoDB, although this is not an absolute requirement.
- A simple Integrated development environment- IDE.
Handling Notifications Asynchronously in a Micro-service using a Scheduler
Currently, many Node packages are out there to help us schedule tasks within our Node application, with Node-cron being the most popular. Having said that, let us dive into the codebase.
The codebase can be found in this GitHub repository. Clone the repository to your machine as I will pick extracts from the codebase throughout this section.
The architecture flow summary
- The test service queues notifications to be sent out on the database.
- A scheduler picks these unsent notifications, send them to the notifications service and marks them as in progress.
- The notification service queues the notifications received from the test service in the database and mark them as unsent.
- A scheduler picks unsent notifications, sends them to the appropriate addresses and marks the notification as sent.
- Another scheduler picks all treated notifications and notifies the test service that these notifications have been treated.
- The test service updates these notifications in its database as treated.

The architecture flow diagram
Step 1. The test service queues notifications on the database.
Whenever the test service has a notification it wants to send, it adds it to the database queue.
First, we will start by describing the notifications table database schema.
https://gist.github.com/techbenestudio/b0117687184e477d74fd7d2b91ba801e#file-notificationschema-tsThe table is made of the following columns:
- Type describes the type of message for example Account verification message.
- Channel describes the channel via which the message is to be sent, whether SMS or Email.
- Data is the object that comprises all the specific details for the notification. It is dynamic and dependent on the message type. The notification service understands the structure of the data field based on the notification type.
- Address, a list of addresses that the notification will be sent to.
- Status describes the current state of the notification. Whether it is waiting to be sent, has been sent or is in progress. Note that by default every notification has a default status of INIT,
The notifications are queued to the database via the save notifications function.
Step 2. A scheduler picks and sends all unprocessed notifications to the notification service
https://gist.github.com/techbenestudio/b0117687184e477d74fd7d2b91ba801e#file-scedulerservice-tsThe Scheduler service class has a run function that contains the cron job that picks unprocessed notifications from the queue and sends them to the notification service.
As earlier explained we are using the popular Node-cron package, which we have imported into our project as cron.
https://gist.github.com/techbenestudio/b0117687184e477d74fd7d2b91ba801e#file-scedulerservice-tsThe cron has a function called schedule which takes two parameters, the first being the cron expression and the second being the function to run according to the interval described by the cron expression.
https://gist.github.com/techbenestudio/b0117687184e477d74fd7d2b91ba801e#file-scheduleajobtoruneveryminute-tsIn this case, we are scheduling the task – sendPendingNotifications to run every minute.
https://gist.github.com/techbenestudio/b0117687184e477d74fd7d2b91ba801e#file-sendpendingnotificationstonotificationservice-tsThe sendPendingNotifications calls the getAllPendingNofication which returns all notifications with the status as INIT. These notifications are then sent over to the notification server.
https://gist.github.com/techbenestudio/b0117687184e477d74fd7d2b91ba801e#file-getallpendingnotifications-tsIf the server returns a successful response their status is updated to IN_PROGRESS. If the notification server returns a failed response the status remains the same and they will be picked up and retried later.
https://gist.github.com/techbenestudio/b0117687184e477d74fd7d2b91ba801e#file-postandupdatependingnotifications-tsStep 3. The notification service receives the notification from the test service and queues it in the database
Let us start by describing the database schema for notifications on the notification service.
https://gist.github.com/techbenestudio/b0117687184e477d74fd7d2b91ba801e#file-notificationservicenotificationschema-tsWe have introduced three new fields to the notification schema.
- DocumentId is the id of the notification on the test service.
- Remark holds the error message in situations where an exception occurs when sending out a notification
- NotifiedServer is a boolean flag that indicates if the test server has been notified of the status of processed notifications.
The Notifications sent from the test service are queued on the database with the default status as INIT
https://gist.github.com/techbenestudio/b0117687184e477d74fd7d2b91ba801e#file-notificationservicesavenotificationsmethod-tsStep 4. A scheduler picks unsent notifications from the database processes them and update their status based on the response.
The notification server has two scheduled jobs, but our focus in this step will be on the first. The cron expression on the scheduler indicated that the job – sendPendingNotifications is scheduled to run every minute.
The sendPendingNotifications method fetches all pending notifications from the database updates their status to in progress. It then handles all sending of notifications asynchronously using Promise.all
https://gist.github.com/techbenestudio/b0117687184e477d74fd7d2b91ba801e#file-notificationservicesendpendingnotificationmethod-ts https://gist.github.com/techbenestudio/b0117687184e477d74fd7d2b91ba801e#file-sendnotificationmethod-tsThe sendNotification method sends individual notifications and updates the status of the notification based on the response it receives.
Note that sending notifications is not treated as it is not within the scope of this article.
Step 5. A Scheduler picks treated notifications and sends them back to the test service.
A second schedular in the notification service is tasked with the responsibility of searching for recently processed notifications and notifying the test server of the status of these notifications, whether they were successfully sent or not.
https://gist.github.com/techbenestudio/b0117687184e477d74fd7d2b91ba801e#file-notificationserviceschedulerservice-ts https://gist.github.com/techbenestudio/b0117687184e477d74fd7d2b91ba801e#file-notifyserviceofsentnotifications-tsThe notifyTestServiceOfSentAndFailedNotifications method also updates the notifiedServer field of each notification to true if the call to the test server was successful. This is to ensure they are not picked by the scheduler again.
https://gist.github.com/techbenestudio/b0117687184e477d74fd7d2b91ba801e#file-updatesentnotifications-tsStep 5. The test server receives the notification status update from the notification server.
Finally, the test server receives the notification status update from the notification server and updates the queued notification on its database accordingly.
https://gist.github.com/techbenestudio/b0117687184e477d74fd7d2b91ba801e#file-callbackrouter-ts https://gist.github.com/techbenestudio/b0117687184e477d74fd7d2b91ba801e#file-callbackcontroller-ts https://gist.github.com/techbenestudio/b0117687184e477d74fd7d2b91ba801e#file-updatenotificationsstatusmethod-tsSummary
In this article, we have gone through the basics of scheduling. We covered cron expressions and also talked about how schedulers can be put to use when creating software solutions. We built a simple microservice that handles sending of notifications asynchronously using schedulers and a database for queueing. In summary, schedulers play a vital role in application development and having the knowledge on how and when to apply it is an indispensable tool every software developer should have in his/her arsenal.
Join our team, we are hiring!