Why we love Next.js and server-side rendering

At bene : studio we love knowledge sharing to help the community of professionals. With 10+ years and over 100 projects behind us, we have a vast amount of experience. This is why we have launched a knowledge base on our blog with regular updates of tutorials, best practices, and open source solutions.
These materials come from our internal workshops with our team of developers and engineers.
Pardon the interruption, we have an important message!
We are looking to expand our team with talented developers. Check out our open positions and apply.
Introduction
Next.js has become popular in the last years but why is it such desirable amongst developers? Next.js is a framework built on top of React. It makes server-side rendering possible without any complex configuration. Besides that, it offers several out-of-the-box features which help developers to be faster and more effective. It has a fast learning curve which makes it easy for less experienced developers to implement its amazing features.
Why should you use Next.js instead of create-react-app?
Search engine optimization
A traditional React app is rendered on the client-side. That means when the user opens a React app it only renders the initial HTML shell of the page. As the user navigates through the page the browser fetches the Javascript files which contain the render method for each element. Client-side rendering makes it possible for a webpage to load faster, however, the content is not properly indexed by major search engines.
Next.js allows you to build a React app and render the content on the server in advance. After the initial load is finished, client-side rendering takes over and works exactly like a traditional React app.
Integrated routing
In React if you want to implement routing you have to install a third-party library. When you’re using Next.js everything is taken care of. Inside of a Next project you have a pages folder. Each Javascript file defined here represents a route in your application
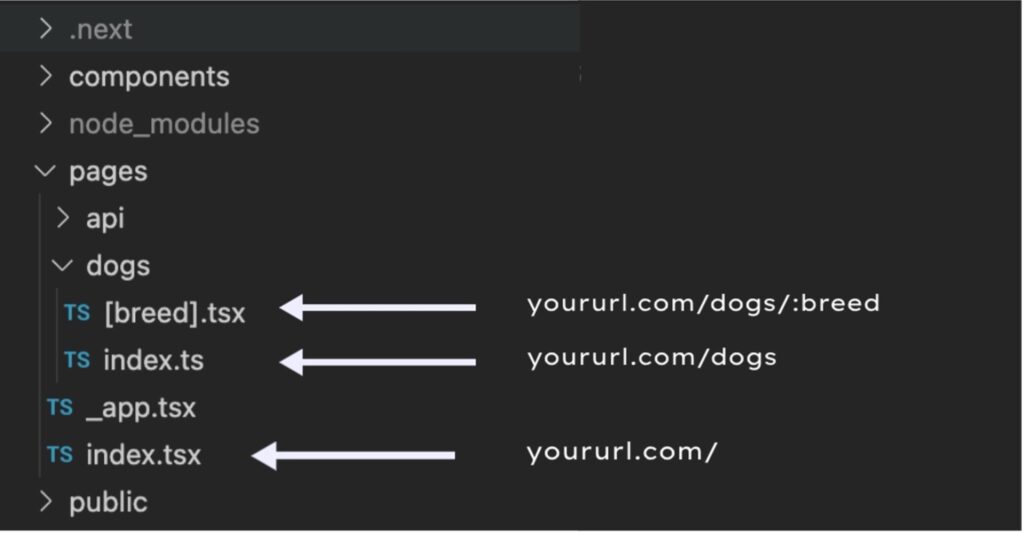
Here we have a dogs route which represents a list of dogs on a page. Let’s assume that the list is dynamically generated and the user wants to get more information about a specific dog. For that, we can easily generate dynamic routes. All we have to do is to wrap the file name in brackets, then next.js will recognize this as a dynamic route.
Data fetching & pre-rendering
Next.js has two types of pre-rendering. Static generation and Server-side rendering. Static generation is also called pre-rendering which allows you to render your pages at build time. With this, you generate a bunch of HTML files and upload them on a static host and they can be opened over a CDN which makes it super fast to visually display the data. With this technique, you can build all your HTML locally and even catch your data. This can be useful when the data doesn’t change often.
In each page’s component, you can implement a getStaticProps function. Within this function, you can fetch data from an API. Then the result can be passed as props to your component.
In case your data changes often you can implement server-side rendering with getServerSideProps where the page is rebuilt each time the user opens it. While getStaticProps runs and builds time getServerSideProps runs at request time. That means the page will fetch the latest data from the server each time a new request is made. getServerSideProps needs to be implemented exactly like getStaticProps.
Styling
CSS modules
If you use Create next-app to create a new next.js application a styles directory will be generated. In this directory, you have the option to create CSS modules and you can define classes that only apply to a specific route or a component. You don’t have to worry about coming up with unique class names to manage your styles. If you want to use styles from a module, all you have to do is to import your module file and then reference your styles as they were javascript objects.
Styled-components
We like to use styled-component for our styles so let’s see how to implement it in a Next.js application. Fortunately, it is possible to achieve server-side rendering with styled-components. The way it works is that every time you render your app on the server it creates a ServerStyleSheet and adds a provider to your React tree which accepts styles via a context API.
There are multiple ways to successfully perform server-side rendering. The styled-components documentation recommends using their babel plugin. This plugin checks mismatches by providing a unique id to each styled element.
Here is what you need to install to get it started:
npm install –save styled-components
npm install –save-dev babel-plugin-styled-components
After installing them create a file called .babelrc in your roots directory. Inside the file, the code should look like this:
Then you need to add a file named _document.js inside the pages directory then copy the code from below to inject the server-side rendered styled into the <head>
After creating this file you will be able to use styled-components within your Next.js application.
Conclusion
Next.js has countless benefits. It helps with SEO by providing a performant app which means your app will get higher rankings on search engines. If you have a lot of data fetching then you should consider using it over React Js since it provides server-side rendering which can also increase the performance of your website. If you have fewer api requests and you only need client-side rendering while SEO is not important for your app then React.js might be a good option for you.
How to create a Next.js app
FIrst you have to install NPM or Yarn on your machine. Then run the following command:

Next.js scripts
In package.json you will see the scripts that were generated.

DEV: In development, you only have to execute the „dev” script which will run your app on localhost:3000
BUILD: If you run the build script a built application will be created which will be ready for deployment
START: The start command will build your Next.js application
LINT: It will lint your Next.js project using ESLint to warn you if your code needs to be fixed before deployment.
For a more in-depth tutorial we recommend you to check out the official Next.js documentation. They have an interactive course that provides an effective way to learn every detail.
Join our team, we are hiring!