Workshop Recap: connect native modules to build an awesome music creator

At bene : studio, we love knowledge sharing to help the community of professionals. To share our 10+ years of experience we have launched a knowledge hub on our blog with regular updates of tutorials, best practices, and open source solutions.At bene : studio, we love knowledge sharing to help the community of professionals. To share our 10+ years of experience we have launched a knowledge hub on our blog with regular updates of tutorials, best practices, and open source solutions.
Pardon the interruption, we have an important message!
We are looking to expand our team with talented developers. Check out our open positions and apply.
Introduction
This article is based on a live workshop we held in November 2021. Follow the steps in this article to complete the workshop at home!
Learn how to work with React Native Modules (both Java and Swift) and connect them with React Native. We also show you how to play, schedule and play sounds precisely.
Before you start
Prequisites
1, Set up a basic React Native environment:
Visit Reactnative.dev and select React Native CLI quick start. Choose your Development OS and Target OS. We are showing you how to build both an Android and an iOS version as well, so if you have a Mac choose both Android and iOS targets, then follow the instructions to install the environment.
2, Clone this repository.
3, Run the commands in the readme and make sure they work:
npm install
npx pod-install
npm run android
npm run ios
Connect native modules to React Native
The React Native community is awesome. If you would like to implement a native functionality in your project they probably already have a package for that. But there comes a time in every developer’s life when that is not the case. Maybe you need to integrate a specific SDK or you want to try out the next hot library that came out yesterday.
Fortunately, the React Native team made it fairly easy for us to bridge these modules. We will take a look at how it is exactly done by implementing a simple application together.
What exactly are we building?
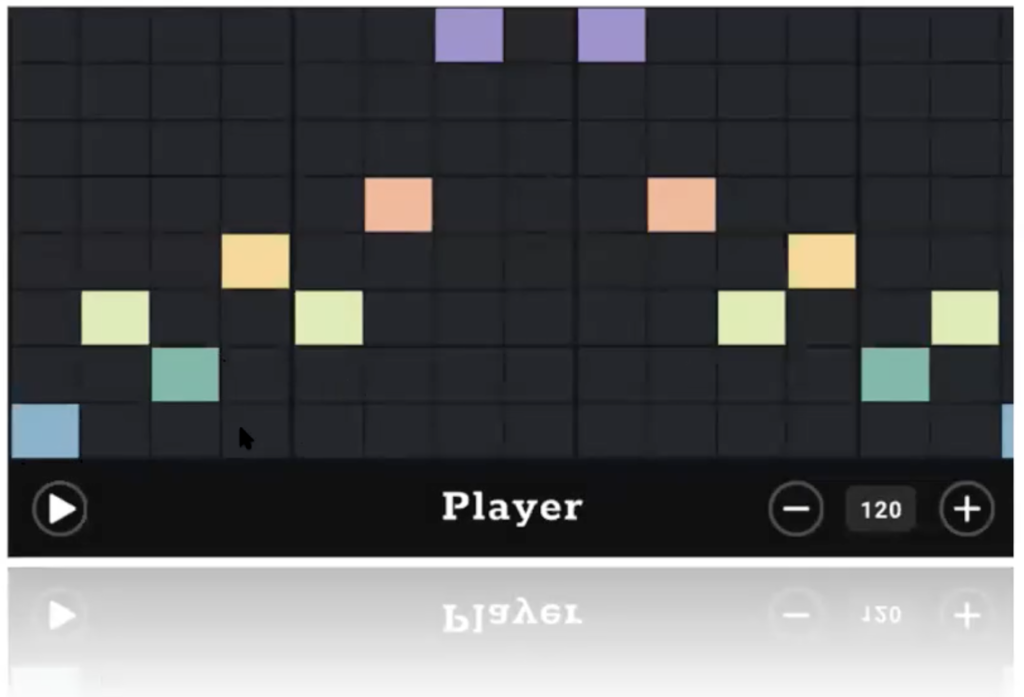
MusicPlayer is an application that lets you create simple melodies using a grid system. Each column of the grid represents a bar or measure and each row represents a specific note.
You can press a cell to schedule it for playback or press it again to unschedule it. After selecting a couple of cells you can press the Play button to listen to what you have created.
Step 1: Creating the Android Module
First, we will bridge the Android module. The easiest way is to extend ReactContextBaseJavaModule.
Create a file named PianoPlayerModule.java in the android/app/src/main/java/com/musicplayer folder with the following content:
We will use the PianoPlayer class to schedule the playback of our notes.
We will be able to access our module by the name returned by the getName method.
We also need to tell React Native about our module. We need to create a package. Packages implement the ReactPackage interface.
There are two methods that we need to implement, createViewManagers and createNativeModules.
They should return a List of ViewManagers and NativeModules respectively. ViewManagers are responsible for bridging native views. We won’t need them in this example, so we can just return an empty list.
For NativeViews we can return a list containing our newly created module.
Let’s create a file called PianoPlayerPackage.java in the same folder.
We will also need to register our package. Let’s head to MainApplication.java and add the following line to the getPackages method (line 35)
packages.add(new PianoPlayerPackage());
Now that we have our module registered, let’s implement some methods that we want to access from our JavaScript code.
Add the following code to PianoPlayerModule.java
The @ReactMethod annotation tells React Native that we want to access these methods from the JavaScript thread.
When we invoke these methods in JS, React Native will convert the arguments to their corresponding types in Java. You can find the supported argument types here. https://reactnative.dev/docs/native-modules-android#argument-types
We can access our module through NativeModules exported by React Native.
Let’s open src/modules/PianoPlayer.ts and import it.
PianoPlayerModule is the name we defined in PianoPlayerModule.java
We can now call the methods defined in the module.
We would like to know when the playback is done. We can make the method return a Promise by adding a promise as a last argument to the method.
Let’s define a new field in PianoPlayerModule, we will use it in a second.
Modify the play method to accept a Promise and just store the promise for now.
PianoPlayer can notify us when the playback has stopped via the PlayerListener interface. Let’s make PianoPlayerModule implement the PlayerListener interface.
The interface contains 2 methods that we need to implement: onStop and onBeatChange. We can leave onBeatChange empty for now.
Let’s resolve the promise when the playback is stopped by calling its resolve method. We can just pass in null as an argument since we don’t want to return anything.
We can clean up playPromise afterwards by making it null.
There is only one step missing, we need to tell pianoPlayer that we want to know about these events by setting PianoPlayerModule as a listener of pianoPlayer. We can do that in the constructor after PianoPlayer is created.
Now we can rebuild our project and see if we did everything correctly.
Remember that you always need to compile your project if you touch native code, hot reloading will not work.
Let’s open the app, select some notes in the grid and press play. You should hear the notes played and the play button should turn back into a stop button when the playback has finished.
Step 2: Handling Android events
Now that we can play our melodies it would be nice if we could see which notes are currently being played. We could achieve this by sending events from the native thread when the current note changes.
Let’s create a new void method in the PianoPlayerModule called sendOnNoteChangeEvent. It should expect an int argument beatIndex.
We can send events to the JavaScript thread using the RTCDeviceEventEmitter. We can obtain the event emitter from the react context. It provides an emit method with two arguments: eventName and params.
eventName is used to define the name that we can use on the JavaScript side to subscribe to this event. We can send any additional data using the params parameter. It accepts the same arguments as the ReactMethods, the only difference is that we need to use WriteableMap and WriteableArray instead of their Readable counterparts. The com.facebook.react.bridge.Arguments class has some helper methods to create these arguments.
For this example, we can just send the beatIndex.
Now we just need to call this method when the beat changes.
PianoPlayer will call the onBeatChanged method of the listener when this happens, so we can call it from there.
The only thing missing is to subscribe to these events in JavaScript.
Let’s navigate back to PianoPlayer.ts.
We can register to the events using the NativeEventEmitter module. Let’s import it alongside EmitterSubscription.
Now we can create two variables, one for holding the event emitter, and one for the subscription. We can instantiate the event emitter by passing in our module.
Let’s create an event listener that we will use internally to call our OnNoteChangeListeners stored in the listeners array.
We can modify our addOnNoteChangeListener and removeOnNoteChangeListener functions to register and unregister our event handler.
We can use the addListener method of the eventEmitter. It expects two arguments: the event name that we defined in the native module and a listener. It returns an EmitterSubscription that we can use to remove the listener later on.
When we are done we can rebuild the application. Let’s create a melody again and press the play button. We should see that the currently played notes are highlighted during playback.
Step 3: Creating the iOS module
Now that our Android app is up and running, let’s implement the same for iOS.
First open ios/MusicPlayer.xcworkspace in Xcode and create a new Swift file called PianoPlayerManager with the following content:
The implementation is almost the same as on Android, we create an instance of PianoPlayer and proxy the methods we want to expose to React Native.
Now we just need to tell React Native about this module.
React Native provides some macros to make this easier. Unfortunately macros are only available in Objective-C, so we can’t avoid writing some Objective-C code to bridge our module, but don’t worry, it won’t be too complicated.
Let’s create a private implementation file called PianoPlayerManagerBridge.m with the following content:
The RCT_EXTERN_REMAP_MODULE macro will register our module. It expects 3 arguments:
js_name: The name we would like to use to access the module on the JavaScript side
objc_name: The name of the class we would like to export
objc_supername: The name of the superclass of the exported module
If you would like to use the same name on the JS and Native sides you can use RCT_EXTERN_MODULE and omit the first parameter instead.
RCT_EXTERN_METHOD is used to export our methods. The first parameter should be the name of the method, followed by the method arguments. You can learn more about the supported argument types here https://reactnative.dev/docs/native-modules-ios#argument-types.
In order to let the Objective-C runtime access our swift code we need to annotate them with the @objc modifier.
Similarly to Android, we would like the play method to return a promise that resolves when the playback has stopped.
We need to add two new arguments to our play method: a RCTPromiseResolveBlock that can be invoked to resolve the promise and a RCTPromiseRejectBlock for rejecting it.
Don’t forget to update the implementation file as well.
Let’s create a new field in the PianoPlayerManager that will hold a closure called handleStop. We will use it as a callback when the playback has stopped to resolve the promise.
And extend the play method to assign a value to this newly created field.
Now we just need to get notified when the playback has stopped.
Let’s make PianoPlayerManager implement the PianoPlayerDelegate protocol.
We need to implement two methods, onNoteChange and onStop. We can leave onNoteChange empty for now and call handleStop from onStop.
Now everything seems ready, but if we run the application we will see that it is crashing.
The reason for that is that we are trying to subscribe to an event that hasn’t been defined in our module. We will fix this in the next step.
Step 4: Handling iOS events
In order to send events we can extend the RCTEventEmitter class and override the supportedEvents method. It should return a list of the names of all the supported events.
We only have one event, “noteChange” so return that.
Now if we run the application again it shouldn’t crash anymore.
The only thing missing is to send the actual event when a note changes.
We can use the sendEvent method of RCTEventEmitter to do that. We can use its withEvent parameter to define the name of the event and its body parameter to send any data along with the event.
Let’s modify the onNoteChange function to send an event.
We can rebuild the application and if we did everything right it should work the same way as on Android.
Do you have questions?
Please send them to partner@benestudio.co, and we are happy to set up a talk with our engineers.
Are you looking for a partner for your next project? Check out our services page to see what we do, and let’s set up a free consultation.
Join Our Engineering Team, We Are Hiring!